


Time to celebrate! After I finished making Christmas gifts and January’s birthday cards (posts still to come), I was ready to turn to creative play to relax rather than for need. I’ve been playing with making 3 different types of pockets. These can be used in journals or as stand alone pockets for sharing with others.
Being creative doesn’t require being a talented or skilled artist. Making beauty from ashes is for everyone,
so Grab your supplies and join me on this journey.
The first style, that I’ll share today, was inspired by Linda Israel’s January Challenge. A Paper Sack Envelope Pocket. Watch her video for her instructions and her challenge. But below you’ll find my take.
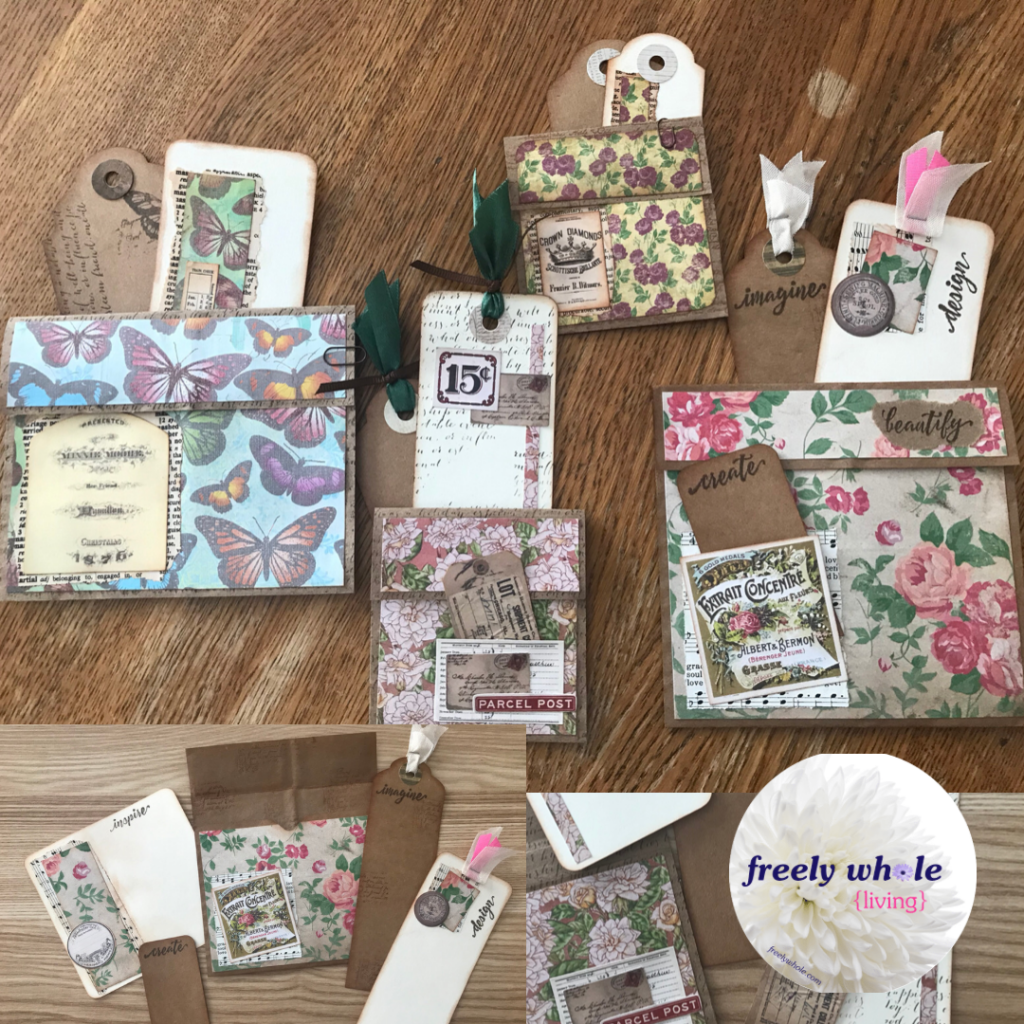
A cut down paper bag forms the envelope pocket. When glued to a journal page or other backing, a second pocket is created behind the envelope. These envelopes are decorated with patterned paper (or your own gel prints), and other scraps, book pages and ephemera. I generally use 3 inserts per pocket, a Journaling Card inside the envelope, and a tag and a bookmark/tag decorated to match inserted behind the envelope, in the pocket formed by putting the envelope onto a journal page. All 3 provide writing/journaling space. Another, mini tag or card may be added to an additional pocket/tuck on the front of the envelope.
Supply list:
- Paper sack. Medium weight is best. Linda’s sack was 12×17”. Mine was smaller 8.5×14” with a 3” depth/gussets.
- Patterned paper scraps (or gel prints)—large enough to cover front and flap of envelope. At least width of envelope, and length of envelope front plus flap.
- Heavyweight cardstock, for Journal card and Tags. Neutral color(s). I use off-white/ivory for Journal card and Bookmark/Tag, and brown heavy Tag stock for Tag.
- Ink and Blending tool. Distress Vintage Photo.
- Stamp. Script or background.
- Corner rounder. Tag corner punch. Envelope Punch Board. All optional.
- Paper cutter or scissors. Tim Holtz Guillotine.
- Glue. Distress College Medium.
- Decoration bits: Book and/or Music paper. Small ephemera. Word stamps or stickers. Fabric/Ribbon/Lace.
- Optional: Sewing machine.
Step 1:
- Open sack bottom and smooth flat. Cut top edge of bag even.
Step 2:
- Cut strips/rings from the sack. A 5” wide pocket will fill a 5.5”x8.5” (common size) journal page. 4” is the widest you can use in a Traveler’s Notebook, and also works well in the common size journal. 3-3.5” wide is also a nice size in a TN.
Step 3:
- Cut the ring strips open, by cutting on the middle fold of the two gussets. The other gusset folds will create your flaps, ~1.25-1.5”. (If larger, you may want to reduce it.) If your sack is 12” or more wide, you can also cut down the middle of each strip. (If sack wider than 10” for 3” wide strips.) Your cut sack strips will be ~5×9”, or 4×8-8.5”, or 3×6.5-7.25”.
- Fold the bottom of each strip (opposite of gusset fold) up to about 1/2-3/4” short of reaching the flap fold.
Step 4:
- Stamp front edges, and inside and outside of flap with script or background stamp. It doesn’t have to be even, just adding background interest. OR, ink the edges.
Step 5:
- Cut mats for front and flap of envelope. Cut one mat 1/4” narrower and 1/4” shorter than envelope front, and another 1/4” narrower and 1/4” shorter than the flap. Round corners of mats, if desired. Ink edges of mats, if desired. Glue mats onto envelope, centering and lining up side edges of both mats. (Alternately, sew mats onto envelope if preferred.) Cut thumb notch and ink it, if desired.
Step 6:
- Glue side edges of envelope, to seal it closed. (Alternately, sew envelope around all 4 edges with flap open.)
Step 7:
- Cut inserts from neutral cardstock. Journaling card: Width 1/2” narrower than envelope, and height 1/4-1/2” taller than pocket front, to fit in pocket under flap. Bookmark: 2” wide x 5-6 1/2” tall. Tag: 1 1/2 -2 1/2” wide x 4-5 1/2” tall. Round /angle corners of each, as desired. Ink edges, if desired.
Step 8:
- Decorate front and flap, and inserts, as desired, collaging book/music page, ephemera, patterned paper scraps, words, fabric bits/ribbon/lace. See pics.
- A small tag glued to the front pocket or put into small pocket/tuck on front, and sticking up over flap can help hold flap closed.
Step 9:
- Glue sides and bottom edges of back of envelope to journal page. Put Bookmark and Tag behind envelope.
I’ll get a video tutorial posted for you when I have time.
That’s it! You now have a beautiful envelope pocket, made from scraps and trash, to add to a Journal or give to someone. You got creative and made Beauty from Ashes!
We want to see what you do! Subscribe and Comment here! Join my groups and Share a picture of your Paper Sack Envelope Pockets on our Freely Whole Creative Community at MeWe or Facebook or follow me on Instagram, and tag me #freelywhole
Living Coram Deo
SDG!
~ Liberty
Subscribe to my email list in the sidebar and get notifications of future posts on this website.
Join me on Facebook, Like & Follow my Freely Whole public page.
To share Soul Care Creativity, join my Freely Whole Creative Community at MeWe or Facebook,
and Follow FreelyWhole on Instagram and tag me in your creations #freelywhole
💝
Living Coram Deo & freely whole
SDG!
~ Liberty—Life Restoration & Soul Transforming Creativity Coach
Empowering you to live a life that is Freely Whole—spirit, soul, and body—in Jesus!
Connect with Freely Whole on Social Media
💝
Discover more from freely whole {living}
Subscribe to get the latest posts sent to your email.