


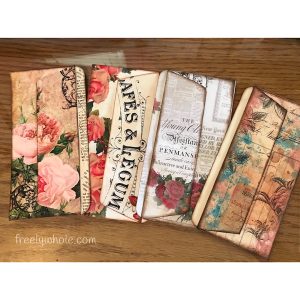
I see a lot of different envelope pockets made for Junk /Eclectic Journals and Traveler’s Notebooks. But I’ve never seen any made from bank envelopes. That’s the type of envelope we seem to get the most of around here, so I wanted to have a play and see what I can do with them. I’ve come up with a few designs, and today’s post and video introduce you to the first. A Double Pocket, that can become a Triple Pocket when added to a journal page. These pockets are super easy to make, fast, and require very few supplies. If you’ve got bank envelopes, glue, scissors, and either scrapbook paper or a printer, you can do this! Even if you have no artistic talent!
Grab your supplies and join me on this quick creative journey.
Supplies needed:
- Bank/cash envelope
- Patterned paper—scrapbook paper (not card weight), downloaded printable, or other paper with a pretty design
- Light/medium weight neutral colored cardstock
- Glue—I like Distress College Matte Medium and/or Zig 2-way
- Scissors—and optional Paper trimmer
- Optional: Ink and Blending Tool
- Optional: Corner Rounder
- Optional: Background stamp and acrylic block
Watch the video! Written instructions below.
1) Cut paper. My bank envelopes are just under 3.25”x7”, with the flap being 2”. So patterned paper is cut scant 3.25”x7” and scant 2”x7”. Cut cardstock 3 5/8”x7”. See video for more details.
2) Glue patterned papers to the envelope body and flap, as directed on video. (Front side of envelope where the flap is attached.) The flap folds over to the opposite side of where it seals, creating the narrow pocket. Trim around shape of flap. Ink all edges where the paper is attached. Glue the short ends of the flap to front of the envelope, on top of the patterned paper, to create pocket. Note: If your paper’s design is very light colored, the printing on the envelope may show through, and you may need to gesso over it before gluing your paper on.
3) Stamp background along the edge of cardstock that will be visible from under the envelope—or glue patterned paper on it. Round top and bottom corners of that edge, if desired. Ink edges. Glue cardstock to back of bank envelope, applying glue to envelope (not cardstock), so you don’t glue this pocket (the original envelope) shut.
4) Decorate/ embellish envelope in any way desired. Add tags or journal cards to the pockets.
5) Glue 3 sides of envelope pocket to journal page, creating a third pocket. Add another tag/journal card in that pocket.
And, you’re done! You’ve made Beauty from Ashes/Trash. Easy peasy!
We want to see! Subscribe and comment here. Join one of my Creative Communities a share a picture there: Freely Whole Creative Community at MeWe or Facebook or follow me on Instagram, and tag me #freelywhole
Living Coram Deo
SDG!
~ Liberty
Subscribe to my email list in the sidebar and get notifications of future posts on this website.
Join me on Facebook, Like & Follow my Freely Whole public page.
To share Soul Care Creativity, join my Freely Whole Creative Community at MeWe or Facebook,
and Follow FreelyWhole on Instagram and tag me in your creations #freelywhole
💝
Living Coram Deo & freely whole
SDG!
~ Liberty—Life Restoration & Soul Transforming Creativity Coach
Empowering you to live a life that is Freely Whole—spirit, soul, and body—in Jesus!
Connect with Freely Whole on Social Media
💝
Discover more from freely whole {living}
Subscribe to get the latest posts sent to your email.